wor·sted[woos-tid, wur-stid] noun 1. firmly twisted yarn or thread spun from combed, stapled wool fibers of the same length, for weaving, knitting, etc. Compare woolen. 2. wool cloth woven from such yarns, having a hard, smooth surface and no nap.

Tuesday, November 27, 2012

Men's Striped Beanie Pattern FREE

As promised, here it is!  I hope you all enjoy making it as much as I do!  Note:  I did promise you the woman's pattern too, and I have it all written up, just not typed and no pictures, but I will get it up this week, I PROMISE! Also, I just want to give a huge thanks for your support!  Please keep spreading the word about our blog.  The more traffic we get the more FREE stuff we can offer. Thanks again!
-Cat

Materials: 

· I hook (hat body) and H hook (bottom rim)

· 4 colors of Worsted, Med yarn. (I used Vanna’s choice Sapphire, Chocolate, Mustard, and Olive)

Special stitch: 
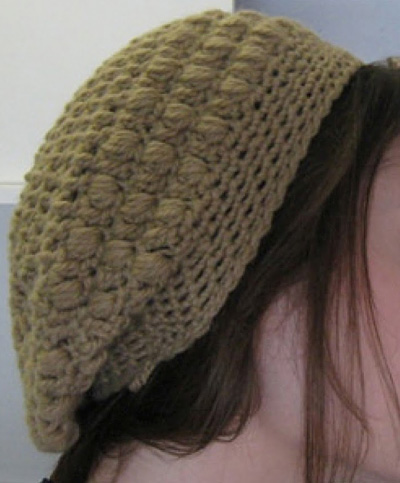
This diagram shows where the horizontal bar (or diagonal looking stitch) is located (on WRONG SIDE of rnd):

Ch4, ss to 1st ch to form loop (or do a magic circle), ch 2.

Rnd 1: With color #1: Work 12 hdc into loop. Join with ss to back horizontal bar (or diagonal loop -- that's what it looks like to me!) behind beginning (you will do this through the whole pattern! See special stitch picture above) ch 1. Change to color #2. (12) ch 1

Rnd 2: Work 2 hdc in same st as joining (always do this at the beginning of each row). 2 hdc in each back diagonal st around. This will make the stripes stand out, so remember to always do it throughout pattern. Join & change to color #3. (24) ch 1

Rnd 3: 2 hdc in same st as joining, hdc in next 2 st. * 2 hdc in next st, hdc in next 2 st. Repeat from *. Join & change to color # 4. (32) ch 1.

Rnd 4: 2 hdc in same st as joining, hdc in next 4 st. * 2 hdc in next st, hdc in next 4 st. Repeat from *. Join & change to color # 1. (39) ch 1.

Rnd 5: 2 hdc in same st as joining, hdc in next 6 st. * 2 hdc in next st, hdc in next 6 st. Repeat from *. Join & change to color # 2. (45) ch 1.

Rnd 6: 2 hdc in same st as joining, hdc in next 6 st. * 2 hdc in next st, hdc in next 6 st. Repeat from *. Join & change to color # 3. (52) ch 1.

Rnd 7: 2 hdc in same st as joining, hdc in next 7 st. * 2 hdc in next st, hdc in next 7 st. Repeat from *. Join & change to color # 4. (59) ch 1.

Rnd 8: 2 hdc in same st as joining, hdc in next 8 st. * 2 hdc in next st, hdc in next 8 st. Repeat from *. Join & change to color # 3. (66) ch 1.

Rnd 9-20: hdc around (66). (Note: always feel free to make the hat shorter or longer by taking out rows or adding them)

Rnd 21: With H hook: sc in back diagonal loops around.

Rnd 22-23: sc around in each sc stitch.

Fasten and finish off. 

That's it!  Let me know if you have any questions!

-Cat

UPDATE 3/11/2013

I have redesigned this pattern AND added child and women sizes!!!!  Here is the link!

Pin It

Monday, November 26, 2012

Great Christmas Crochet Patterns FREE

I am so excited for the Christmas season this year!  I don't know if it has to do with living in a new home, and having plenty of places to decorate, or the fact that my kids are at an age where Christmas is simply magical!

Since our previous posts pointing you all towards some fun seasonal patterns out there on the web seemed to be pretty popular, I thought I would mention some fun Christmas and Winter ones as well. (All titles and pictures are linked to the appropriate site for credit)

(I think this can be easily adjusted to bigger sizes as well)
(Can be used as finger puppets)
All the patterns are at this link, you just have to scroll down the blog half way to find the download links.


Click on the link above to see how cute it is on a baby!!

Happy Crocheting!!
-Cat

If you like this post and others that we put together, please like us on Facebook or follow this blog.  Thanks! Pin It

Tuesday, November 20, 2012

Fishing for Followers

UPDATE:  I have changed my mind, I will post this pattern when we get 150 likes on Facebook (22 more to go!) OR we get 80 new followers on here.  I really want to post this ASAP, but we really need to get the feeds up on our site.

Okay, I have this pattern all written up, for Men's size AND Women's size!
Not only is it easy to make, I took some pictures to give you step by step guides, but they are quick projects that would make FANTASTIC Christmas gifts!

But as I was thinking of posting it to share for free, which I still plan to do, I thought about making a game of it.  Here it is:

I will post these patterns for FREE use, IF we can reach 100 followers on this page OR 200 likes on Facebook, whichever we get first! (Please see update at the top)

So spread the word!!

-Cat Pin It

Saturday, November 17, 2012

Winner of the Owl Hat!!!

And the Owl Hat goes to... (thanks to random.org)

telecommutingtechiemom!!

Congratulations! Please get the size and colors you want and your shipping info to me so I can get it made and to you ASAP!
Thank you everyone for your entries and your help! 


Pin It

Tuesday, November 13, 2012

Owl Hat Give Away!

Hi, I (Amy) am going to be giving away a cute owl hat!  It is the one I have made the most this season. It will be made to order, so when you win it, let me know what size and colors you want! I can even do it in boy colors (navy blue, greens, gray. etc)  and leave off the flower.


To win this hat

Mandatory:
  • Leave a comment on here telling us what you would like to see more of on this blog.  Examples: giveaways, tutorials, free patterns, pattern reviews, etc.
Other Entries (Optional): (Leave a separate comment for each entry that you do please!  Each comment = 1 entry)
  • Become a follower of this blog. (If you already are one, still leave us comment and let us know!)
  • Like us on Facebook (Again, if you already do, still leave us a comment and let us know!)
  • Follow us on Twitter (Same as above if you already do)
  • Blog about this giveaway.
  • Share this giveaway on Facebook.
  • Tweet about this giveaway.
  • "Pin" this giveaway.
  • Check out My Etsy page  and come back and leave us a comment on your favorite hat I have posted there.  I know I don't have much right now... I am working on it.  I am planning to get a men's beanie and a woman's hat and headband.
Contest ends Friday November 16th at 11:59 pm.  Winner will be announced on Saturday.  I will get your hat mailed to before Thanksgiving.  Have fun and good luck!

~Amy


Pin It

Thursday, November 8, 2012

Cable and Puff Stitch E-Reader Tutorial

I've been thinking about what I could do a tutorial about. About two weeks ago Cat challenged Amy and I to come up with our own e-reader designs and so I decided that I would multi-task. I love to multi-task and get a lot of things done at once. So I decided that I would make my e-reader and use a stitch that I could do a tutorial about.

So the first thing I did was decide what stitch to use. I really like the cable stitch, as evidenced by creating my own pattern for a newborn hat. You can see my blog post about it here and at my Etsy shop here. I also did a cable pattern review here and Cat shared the puff stitch instructions in her Pumpkin Hat pattern here. Another major reason I chose the cable stitch was because it would make a cushion for extra protection for an e-reader.

To start out with I just made a chain the width I wanted for the e-reader cover. I made sure it was divisible by four order to have symmetry in my design. I ended up with 22 st in my chain. The first dc goes into the third st from the hook. For my pattern I did *four double crochet (dc), four post stitches, repeat *, and four dc. The post stitches varied between back post double crochet (bpdc) and front post treble crochet (fptc) depending on which side you were on.

**Note you will want to have the cable pattern handy to be able to make this cozy cover and have your cables turn out the same. Use only steps 1-3. Steps 2-3 repeat for the cables (only with the extra cable and 4 dc thrown in).**


Here is a picture of the first several rows:


I used my kindle for my pattern size but I made it bigger so that if you were to have a larger e-reader or had one in a different case it could just slip in too.

In this design I wanted to be able to make a long strip and fold it over to make the pocket for the e-reader. Because of the cable stitch adding cushion, by folding it over you have that cushion protection on the front and back. Once I had it long enough I changed the pattern so it would fold easier. To make it more clear I've separated each row.

1. I did a row with the back post dc (bpdc) just like normal.
2. On the next row I did: 4 dc, 4 fpdc (front post double crochet), 4 dc, 4 fpdc, 4 dc; turn ch 2.
3. Sc (single crochet) 20 st
4. Dc (double crochet) 20 st
5. Normal bpdc row.
6. Continue on with the cables.

It is hard to see it in this picture (I thought I got a better picture but it didn't turn out like I thought it would)  but the gap in the cables is this change in pattern. This part will be the bottom of the cover.


Here it is the almost finished. When I reached the point where it would fold in half and be equal in length I added another section with a different pattern and then continues on with more of the normal cable stitch pattern. This part was to fold over and I added a button loop.


Folded up:


I had been thinking how I was going to sew the sides together and almost from the start I thought of the puff stitch. I actually have never used it before (I'm still branching out and learning new stitches) and so I wondered how it would look on the sides.

What do you think?


I thought it turned out really cute. : )

Now I went from the top to the bottom this time so that the puff stitches would match. They look different from the front side to the back side so you want to keep it the same. I attached the yarn with a ss and did a sc in the same stitch. My pattern is as follows: *puff st, sc in the next two st. Repeat from *. Pretty easy huh. I started at the bottom fold and worked my way up. I then smoothed out the cover so I knew where to start for the other side.

I also added some red edging around the button loop.


And the final product...


I really enjoyed making this cover. It was so much fun to make something new and to have a puzzle to solve. I liked the colors too. I picked white hoping it would make the cables show up better and I had to have red. It is almost Christmas after all. : ) Have you made anything new? What's your favorite creation you have made? We'd love to hear from you and you can send pics too!

~Heidi

Pin It

Cable Stitch Pattern Review

I'm excited to do this pattern review, it was fun to learn how to use this stitch and then have fun with it.

Cat led me to this pattern for crocheting cables. It's at www.woolcrafting.com. They have a ton of information available on their website, this pattern is one of many things you can find there.


This is actually a good pattern. But if you don't know what a post stitch is then it makes it hard to do this pattern. Now don't get discouraged and think, "well that's that, I can't do this," because before I had ever seen this pattern I had never done any type of post stitches. So if I can do it, so can you!

This pattern also includes double crochet and treble crochet stitches. Those tutorials will be up soon so I'm not going to go into those here. Now for the front and back post stitches. I could not see what the pattern was trying to tell me to do so I went to YouTube. I LOVE YouTube! It is amazing the information and tutorials you can find there. Just tonight my husband was looking up taffy and gummy bear making. So you can find most anything on YouTube and there are TONS of videos on crocheting. You can type in anything and you will find several videos. Sorry I'll stop going off on a tangent. : ) I found a great video that shows you how to do the front and back post stitches. It is located here.

This pattern comes with full color pictures and everything, but I just couldn't get it, so that's why I went to YouTube. Now you might learn differently or pick up on things faster and this tutorial will be wonderful for you, I had to have a video. And that's ok. We all learn differently and need to absorb information in different ways. That's why there are so many different videos, blogs, Pinterst pins about many of the same things. You just have to find what works for you.

Now as to the changes I made with this pattern, I left out Step #5 and just did 1-4 and repeated until the end. This is the pattern I altered as the base for my newborn cable hat. Here is another picture of what I've done with it.


You can check out my full E-Reader tutorial here.

This was a fun pattern and is very versatile. I would just play with it and have fun. You can make so many different things with it.

Do you have any things you've made with the cable stitch? Have you done any front/back post stitching, maybe to make some ribbing? Share some pictures of what you've made, we'd love to see them!

~Heidi


Pin It

Tuesday, November 6, 2012

Fall and Thanksgiving FREE Crochet Patterns!

Since we seem to have lots of interest in our FREE pattern posts, we wanted to do a Fall and Thanksgiving one too.  Although we didn't make these, we love to point our friends in the right directions!

So here are some of the best ones I have found:

Crochet Turkey Coasters and Ornaments
Pattern found on their site here!

Fall Leaves
By Linda Permann of CraftStylish.com

Autumn Leaves Belt
by Better Homes and Gardens

Fun Fall Slippers
by Goodknits

Lizzie Slippers
by Goodknits

Puffy Slouch Hat
by AllCraftsBlogs

Don't forget our own patterns here:

Newborn Pumpkin Hat
by Cat

Super Hero Masks
by Cat

Candy Corn Hat for Toddlers and Children
by Cat

Hope these give you some great ideas!!!

Happy Crocheting!

-Cat
Pin It

Monday, November 5, 2012

Turkey Hat Listing Up!

I finally put a listing on my Etsy page for this little guy (hat, not baby):
$23.00 -- Newborn, Baby and Toddler Sizes
You can check out my listing here!

I reviewed this pattern in an old post found here.

Original design and Pattern are by Chelsea @ A Chick w/ Sticks. Pin It

Sunday, November 4, 2012

Rudolph the Red Nosed Reindeer and Clarice the Doe Hats

Last year, my crochet friend, Chelsea over at A Chick w/ Sticks, sent me a few of her patterns to go over and look for typos, and maybe make a few to try it out.  You may remember the post I wrote about her fabulous Turkey Hat.  Well, one of the patterns she sent me was for Rudolph the Red Nosed Reindeer and Clarice the Doe.  It has taken me a while to go over them, and for this I feel really badly.  But recently, I have been making some newborn hats for some of my friends who are having Christmas babies and I instantly thought of Chelsea's pattern.

I feel in love with this pattern!  (Which you can find here!) And I cranked out a couple of the hats just the way she designed them.  When I first get a pattern, I like to do it just so as to get a feeling for the design and to learn new techniques and get ideas.  Then I decided that I was going to change it up a little to make it look a little more like the characters in the movie I love so much.  This is what I came up with:
If you crochet and are interested head over to her site and get these patterns!  Here are a few of the changes that I made:
Rudolph the Red Nosed Reindeer
For Rudolph, I changed the nose.  Instead of having it just the red nose, I put the white background behind it.  I also made his antlers little stubs since I made this for a newborn, I thought the reindeer should look like a baby too.
Clarice the Doe
For Clarice, I also changed the nose like I did for Rudolph.  As well as I didn't use the Clarice ears that were in the pattern, I used the Rudolph ears for her too because I thought they were just so dang cute!

Anyway, I didn't do too many changes.  I just wanted it to have a little of my personal touch, I guess.

If you are interested in buying a Rudolph or Clarice Hat, here are my Etsy listings:

Rudolph the Red Nosed Reindeer $25
Clarice the Doe $25
Both Hats in a Package Deal! $48

Happy Crocheting!

-Cat Pin It
Related Posts Plugin for WordPress, Blogger...