wor·sted [woos-tid, wur-stid] noun 1. firmly twisted yarn or thread spun from combed, stapled wool fibers of the same length, for weaving, knitting, etc. Compare woolen. 2. wool cloth woven from such yarns, having a hard, smooth surface and no nap.
Showing posts with label Crochet. Show all posts

Thursday, March 1, 2018

Dr Seuss Inspired Cat in the Hat Free Pattern


Dr Seuss Cat in the Hat Free Crochet Pattern


So my son wanted a hat for Dr Seuss week at school. I couldn’t find a pattern online that looked like it would work for what I wanted; which was the right size, something that would work up fast, and was free. So I threw this one together and it worked great. I crochet while I watch TV shows or movies and was able to watch two episodes and get this done at the same time. I'm not necessarily the fastest/slowest crocheter in the world but I felt that the time was worth the investment. I could have done it faster following a pattern and not watching a show at the same time. I hope that helps you decide if it’s worth the time investment.


In this pattern I used an I hook, worsted weight yarn in Blue (Main Color) and White (Second Color). It will fit a 3-4 year old comfortably and fit ok on a 6 year old. My son chose blue and white but you can pick any colors you want. I also designed it to be big at the top and then taper in a little. You can leave out any row decreases and it will make the hat fit a larger child. I can stretch it onto a 22” mannequin head but it looks a little funky. So if you need that size then you should leave out the decreases, maybe keep one of them. You’ll need to adjust the brim increases accordingly as well.


MR- Magic Ring
Ch – chain
Hdc – Half-double crochet
St – stitch/stitches
BLO- back loop only
Hdctog – half-double crochet together
FLO- front loop only
FO- finish off

1. MR, 8 hdc
2. 2 hdc each st, join (16)
3. Ch 1, 1 hdc, 2 hdc (24)
4. Ch 1, 1 hdc in the next two st, 2 hdc (32)
5. Ch 1, 1 hdc in the next three st, 2 hdc (40)
6. Ch 1, 1 hdc in the next four st, 2 hdc (48)
7. Ch 1, 1 hdc in the next five st, 2 hdc (56)
8. This row worked BLO: Ch 1, 1 hdc in the next six st, 2 hdc (64) Switch to Second Color.
9-10. Ch 1, 1 hdc each st (64)
11. Ch 1, 1 hdc in the next five st, 2 hdctog (56)
12. Ch 1, 1 hdc each st (56) Switch to Main Color.
13-15. Ch 1, 1 hdc each st (56) At the end of row 15 switch to Second Color.
16-18. Ch 1, 1 hdc each st (56)
19. Ch 1, 1 hdc in the next four st, 2 hdctog (48) At the end of the row switch to Main Color.
20-23. Ch 1, 1 hdc each st (48) At the end of row 23 switch to Second Color.
24. This row worked FLO: Ch 1, 1 hdc in the next five st, 2 hdc (56)
25. Ch 1, 1 hdc in the next six st, 2 hdc (64)
26. Ch 1, 1 hdc in the next seven st, 2 hdc (72) FO

I only did three rows of blue (row 13-15) because I was low on blue yarn and wanted to make sure that I would get at least three rows on the last band of blue. I wasn’t sure how far it would go and since it went further I went ahead and did four rows for the second band of blue. You can make changes and add another row of Main color for row 16 and then switch colors. Just push the rows down one and have 27 rows at the end of your project.

This is my own pattern I made up. I would appreciate it if you would please link back here if you reference this or sell anything from it.


I hope this inspires you to try something new or to branch out on your own and create something new. J

Happy Crocheting!

~Heidi

Pin It

Friday, December 27, 2013

Crochet Nativity Set (Part One)

I am so excited to finally post about this project I have been doing this year.  The idea came from a fellow crocheter and blogger, Chelsea from A Chick w/ Sticks.  But of course, I really wanted to make it my own.
(I actually made 7 sets, but had already sent out 2 before I remembered to take pics!)

I made 7 Nativity Sets.  Well, they aren't complete YET.  Since I am making so many, I have scheduled this as a 3 year project.  This year, my family received these:


This basic set included:
Mary, Joseph, Baby Jesus, Angel, and stable carrier case.

You can find the original patterns here:
Mary
Joseph
Baby Jesus
Manger
Angel
Stable Carrier Case (Crocheted Cheche)  (Update: this pattern can now be found on Ravelry! Yay!)

And then I made my own adjustments:

For the figures, I didn't want finger puppets, and I wanted to make them bigger.  So I used a G hook, and then I used the stuffing option that the pattern gives.

Mary: I gave her some white trim.

Joseph: I used a darker green, and I added a belt for him.

Baby Jesus:  I made the baby with the smaller hook required in the pattern, I tried it with the G but the baby was WAY to big!  Then I made the manger from the magazine pattern -- but I made the straw a little more loopy.  AND the manger is reversible... so I can turn the straw in and put baby on top if I want.

Angel:  I didn't like the pattern wings -- I thought they looked more like a butterfly's.  So I designed my own.  I wanted them to look graceful and "falling".


Stable Carrier Case:  I actually made this a little bigger than the pattern asks for.  I also made the star bigger too.

NEXT YEAR

This project is the first installment of a 3 year project.  This next year (2014) I will be adding the shepherds, some sheep (my own design), and a donkey (which will be my own design as well), and my family members will get to add them to their collections.

In 2015, I will be doing the 3 wise men, and a camel (again, will be my design).  I will be including the patterns for FREE on this site when I get them done so you will be able to add them to your own nativity sets... yay!

-Cat

2015 UPDATES!!!!

The Nativity Part 2 is up!!!  It includes the links to the shepherds and my own patterns for FREE for the Donkey and the Sheep!!  Click here!!


Pin It

Tuesday, November 6, 2012

Fall and Thanksgiving FREE Crochet Patterns!

Since we seem to have lots of interest in our FREE pattern posts, we wanted to do a Fall and Thanksgiving one too.  Although we didn't make these, we love to point our friends in the right directions!

So here are some of the best ones I have found:

Crochet Turkey Coasters and Ornaments
Pattern found on their site here!

Fall Leaves
By Linda Permann of CraftStylish.com

Autumn Leaves Belt
by Better Homes and Gardens

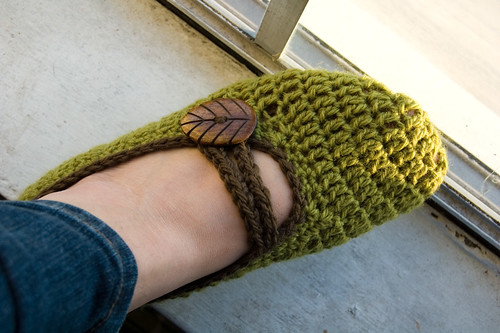
Fun Fall Slippers
by Goodknits

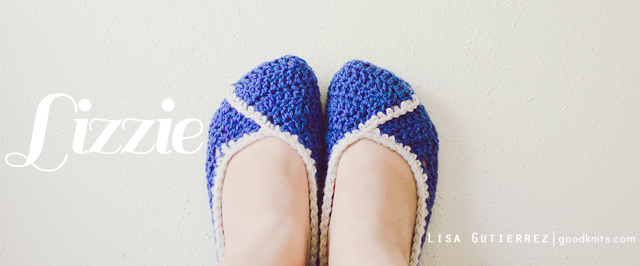
Lizzie Slippers
by Goodknits

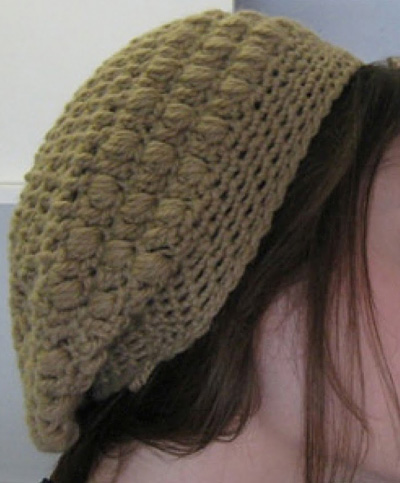
Puffy Slouch Hat
by AllCraftsBlogs

Don't forget our own patterns here:

Newborn Pumpkin Hat
by Cat

Super Hero Masks
by Cat

Candy Corn Hat for Toddlers and Children
by Cat

Hope these give you some great ideas!!!

Happy Crocheting!

-Cat
Pin It

Friday, November 2, 2012

Chaining, Slip Stitching, and Other Crochet Basics

We should have probably posted this earlier, but we got so excited that we skipped ahead a bit.  I didn't realize until this morning, that a beginner wouldn't be able to even start the Single Crochet Stitch without learning to Chain first... duh, on my part.

So here is a quick guide to a few basics of crocheting:

The Chain Stitch (ch):

Just about every project I have ever done starts out with chaining.  When I taught my crochet class, I thought it would take me the first 5 minutes to get everyone to master the chain... I was wrong, it took the whole hour of class to get everyone on the same page.  So don't worry if it takes you a bit to master the chain... there are LOTS of people that find it a bit tricky.  But the key is practice and soon it will be second nature!

For pictures and written instructions, please see this site here!  (Left-handers click here!)

Here's the video:


The Slip Stitch (ss):

It is embarrassing to admit, but when I first started crocheting I thought the slip stitch was the single crochet.  I actually made a whole headband in nothing but slip stitches!!  I felt like such a dork!

There are way better websites to explain the slip stitch than I can.  But I will point you in the right direction!

Here is a really good video on how to slip stitch:


Finishing off:

At the end of the pattern you are doing, it will say "finish off".  This is how you do that:


Working in Rounds:

You will need to know this if you are going to make a hat or anything rounded.  The beginning of the pattern will sometimes say: "Ch 4, ss in first ch to form loop"  This means, you will chain 4 times, then you will slip stitch into the first chain hole and it will form a loop.

Here is a great video that explains all about working in rounds:


I hope that helps you get off to a great start!!

Note:  If you are a book learner, and videos don't help, Lion Brand Yarn has a fantastic illustrated guide you should check out!  You can see it here!

Happy Crocheting!

-Cat

You can also check out these beginner crochet posts:
So you want to Crochet: Starting Out
So you want to Crochet: How to Read a Pattern
How to do the Single Crochet Stitch
8 Free Patterns to Practice Single Crochet Pin It

Thursday, November 1, 2012

So You Want to Crochet: Single Crochet Stitch (sc)

The single crochet stitch (sc) is one of the most basic stitches in crocheting.  It is also very easy to master.  After failing to get good photos of me stitching one, I turned to the internet.  After looking over several sites, I finally found one that was easy to understand and had good views of the stitch and how to do it.

This video is very good and shows very clearly how to make the stitch.

You can also find clear written instructions with pictures here!

I often use this stitch on hats when I do edging or the ear flaps.  The stitches are smaller and closer together, which means smaller holes.. which means.. warmer ears!  I found a good beginner scarf pattern that is very basic and uses the single stitch almost exclusively, so you get really good practice.. and a scarf as well.  It is found here: Beginner's Free Crochet Scarf Pattern.

If you have any questions ask away! We are here to help :)

-Amy Pin It

Tuesday, October 30, 2012

So You Want to Learn to Crochet: Starting Out

This last week, during our ultimate giveaway events, we posed the question:  What would you like to see more of on this blog.  The answers were numerous but had several common themes.  One thing, you as readers would like to see more of are posts for beginning crochet.  I was really excited to see the enthusiasm for crocheting and the expressions for the desire to learn one of my most favorite things!

Today, I wanted to talk about what you need to get the best start on your crocheting journey.  There are easier ways if you know some of the tricks of the trade.  I didn't have anyone to teach me, I am a self-taught crocheter, so I learned by trial and error and more trial and error.  So to save you some of the pains I went through, let me give you my best tips for starting out!  Beginning with yarn selection.

Yarn

When it comes to starting out, believe it or not, there are "good" yarns and "bad" yarns to use to begin your journey.  I taught a some crochet classes this last year, and no matter how many warnings, how many emails or texts I sent out, half of my students STILL showed up to class the first day with yarn I told them NOT to buy.

All yarns are NOT created equal.

Now, mind you, my favorite yarns are not necessarily the yarns that are best to start out with.  But some of my favorite stuff is little harder to work with and not beginner friendly.

The best yarn to start out with, is the Red Heart brand.

Now, before you start whining and complaining that it's the cheap stuff, and it isn't as soft and yadda yadda, let me remind you that you are LEARNING.  There is nothing better to learn all your new skills than cheap, user friendly yarn.  Trust me.  Make sure this is something you really want to learn, something you are willing to invest in later -- and to get the best idea of how well you are able to do this, you need yarn that is easy to work with.  This is the stuff.

Once you have made a couple things to practice your skills, you can move onto some other brands that are little more pricey, but softer.  I really like Vanna's Choice (you can find this one just about anywhere):

Micheal's carries a brand I like called Loops & Threads: Impeccable, that is pretty good:

I LOVE a brand that Jo-Ann's carries called Deborah Norville: Everyday:

Hobby Lobby has one called I Love This Yarn, that is pretty easy to work with as well:

Other Types I love, but don't buy until you are fulling investing in crocheting, because they can be pretty pricey.

Cotton:  I love working with cotton, but it can be a bit tricky and isn't the greatest for ALL types of crocheting.  My favorite brand is carried at Hobby Lobby called "I Love this Cotton"

Wool:  Wool is fun, but super pricey right now.  I only use it on my sock monkey hats.  I would skip this for a while until you are more practiced.

DO NOT USE:

Simply Soft:  Even as an advanced crocheter, I hate this stuff.  I tell ALL my students not to show up to class with this brand EVER, and guess what?  Half of them ALWAYS DO!  I even put threats in my supply lists I send out, that I will drop kick them out the door if they show up with it.  I guess they don't take me seriously.  As a beginner, this is NOT the yarn for you.  I don't care how soft it feels compared to the Red Heart.  Don't fall for it.  Once you learn how to crochet and can actually ALTER a pattern, that's right, you read that right, ALTER a pattern.  Don't even LOOK at Simply Soft.  Here's why:

It claims to be Worsted Med yarn.  This is a total lie.  You will never meet gauge using this yarn as the pattern tells you.  It is thin, slick, and unless you are using a little hook, the stitches are loose, and the product stretches out SUPER easy.  Not worth it.  Don't buy it until you are advanced -- then help yourself.

Crazy Types of Yarn:  Now, I know that the sparkly yarn looks cool, or that ultra super fuzzy stuff... but these are yarns for more advanced crocheters, not beginners.

Now onto the other important item:

Hooks!!

I love my hooks.  It's sad really, but I do.  I actually wrote a post about my favorite types:  You can read it here!
I am a total fan of the Susan Bates hooks (above).  I WILL NOT use anything else.  I started out on the Boye hooks and really struggled until I discovered my Susan's.  I tell all my students this as well, and you do think they listen?  Heaven's no!  They all show up Boye's start cursing and whining when they can't hold them right, the stitches aren't flowing, and they keep catching unwanted yarn onto the hook, etc, etc.  At this point, I break out my Susan's and let them try them out.  They fall in love.  And sometimes they even try to sneak off with one!  They aren't really much more expensive, so that's not much of an excuse, and you don't ever have to pay full price if you print out a coupon or something.  Hobby Lobby has a whole set of Susan's for around $10, and if you get on their email list you will have a 40% off coupon to take in with you... see where I am going with this? (Note: I have never seen Susan Bates hooks at Wal-Mart, just a heads up!)

For just starting out, I would suggest you have two hooks for sure: H and I.  G and J can also be useful, but the H and I are the most commonly used ones for the stuff I do anyway.

Yarn Needles:

Get a package!  They are super cheap and you NEED at least one.  I really like the sharp ones, but lots of people like the dull ones... I don't.  Sharper the better for me!

Time to Learn!!

Now, you have your yarn and your hooks and it's time to get going!!  In summary, here are my best tips plus some for the newbie:

1. Start out with cheap yarn! (Red Heart or something similar)

2. Don't skimp on hooks because it's what's there.  If you don't learn with something you like, you may get discouraged and quit.  Buy one of each brands if you want and give them a go, they really aren't so pricey that you couldn't do it.

3. Invest in yourself.  Don't get discouraged.  There are 3 types of students in my classes: the crochet challenged, the average joes, and the natural talents.  Some may pick it up faster than others, that's natural with anything, BUT I promise you, that by the end of my classes (3 month/ once a week semesters), ALL my students that stuck to it are producing hats and their stitches are nice and even.  One of my most "challenged" students last summer ended coming up with better stuff than the crochet gifted one!  Mainly because she practiced more and really went for it!

4. Practice, practice, PRACTICE!!  You aren't going to get any good if you don't make the effort.  Anything great in life is worked for.  So work for it.  When I first started out, I literally filled a whole garbage bag full of practice projects.  Not good enough to give away, but they taught me how do the stuff I do today.

So pop on over and get your yarn and hooks, then get back here later or tomorrow (depending on when I have another minute) to read my next post on How to Read a Pattern!

Happy Shopping!

-Cat Pin It

Friday, October 26, 2012

Long Elf Hats!

I have been working on elf hats lately.  I have done... well... 2 so far :) They look absolutely adorable on my kids! Haha.  Thought I would post them and see what you think.  I got the original pattern from Oodles 4 Noodles. Then I had to adjust it for toddler size because I don't have an infant to try it on, so I had to settle for my little toddler :) But you get the idea :) Oddly enough... he will wear it all day long! Here are the pictures.. the colors are a bit washed out because my camera isn't very good.


I like how the bottom part of the hat is thicker, makes for warmer ears!If you aren't a crocheter and would like to purchase one of these hats, please contact me, Amy, at nitymesky(at)yahoo(dot)com for prices and to make a customized order just for you!!-Amy


Pin It

Tuesday, November 8, 2011

Not All Crochet Hooks are Created Equal

Like anything, there are brands of crochet hooks that are better than others.  Then again, we all have our personal preferences.  The most popular brand I see around, and the most affordable are the Boye Crochet Hooks:
The person who posted this on their blog (click picture to read article), LOVES these, and swears by them.  They are made of aluminum and pretty durable.  I on the other hand, do not like these.  The ends are too fat and it's hard for me to shove them in small spaces.  Also, the hook catches on yarn threads that I don't want to catch.

My all time FAVORITES are Susan Bates Silvalume Hooks:
I LOVE these!  Not only do they slip in and out of stitches SO much easier, they also don't catch near as much!  The only problem is that they are a little hard to find if you don't know where to look.  I bought mine at Michael's Crafts -- but they don't have them online.  If you want to order them online, you can buy them at Walmart.com or Joann.com.  Each set is around $10.

Here is the difference:
Boye vs. Susan Bates:  The site that posted this picture (click here to read article) favors the Boye ones.  I think it all really depends on the person.  We all move our hands different. No one's fingers are shaped the same!  And some people are left handed.  It's just important to find what works best for your hands.

-Cat Pin It
Related Posts Plugin for WordPress, Blogger...