Cat sent me this pattern a while ago and I've been wanting and wanting to make a stocking. But I just never seemed to find the time. Well with Christmas looming up so fast I knew I really had to get it in gear and get this done. Then it took me almost a week to get this post written, sigh. But at least I'm doing it now right? Lol.
Anyway, I wanted to share with you how it worked out with this pattern. I really did like it as written and how the finished product came out. Mine doesn't look quite as nice as theirs, but hey this was my first time making it. Plus they probably have made a lot of them and have a ton more experience than I do. So I'm pretty happy with the end result.
You can find the pattern at Red Heart here.
Pros about this pattern: First of all it was free. It turned out really cute, and it was written very well.
Cons: I didn't really have anything I didn't like about it. I did have a couple of spots where I had to read over the pattern a couple of times and then do it before I got it right, but that's how it is with anything new.
This was the first time for me to make a stocking. I've never done socks, booties, etc and so I haven't done heels.
First off the pattern has you make the white cuff. Now I got so focused and was trying to get it done that I forgot to put the edging on, so I had to go back and do that. I didn't realize it until I was trying to attach it to the stocking. : ) It was easy enough to fix though so it was ok.
Next I started on the body. It was so easy. It's just a bunch of sc rows. The part I didn't like was that it had me do a specific number of inches (10") and I prefer number of rows. Only because I have to have a tape measure handy in order to measure it instead of just being able to count. But it was pretty easy to do.
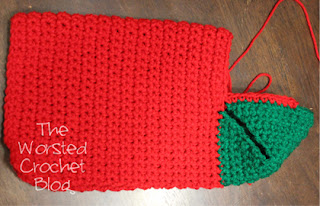
Once that part was done you fasten off and change colors to green for the heel. This part was easy enough to understand for me, it just seems a little weird. You skip most of the stitches and then attach and sc in the last 10 st. Then you bring the other side of the stocking leg around and sc in the first 10 st. This connects the stocking leg together so you can crochet the heel. The weird part is having the two edges not connected. I just wonder why not just do a circle (like in a hat) instead of having to sew the edges. I don't have an answer to that so if anyone knows just let me know. : )
Here's a picture of the heel done. In the picture you can see the opening where the heel stitches have brought the edges together.
Once the heel is done you get to move onto the foot. This is where I had to think it through to make sure I got it right because if you haven't done it before it can just bee confusing.
You can see here the pieces of the heel are brought together. You actually attach your yarn in the middle of the heel and then attach it to the leg portion. You skip the st where the heel st is attached. This keeps it from bulking up. The pattern says "skip row ends of heel". That might or might not be clearer but the picture explains it better than anything else.
Here is the other side. You can see where I started on the heel, connected the heel to the leg, and crocheted around the leg. You connect the heel to the leg by crocheting in the first st, then finish the row. You don't join the st, you turn every row until you have 5". There's that measurement again. ; )
Almost done! The toe was really easy, I've done a lot of increasing/decreasing so this was piece of cake.
Just stitch all the edges together and attach the cuff. The leaves had to be the second hardest part about this pattern. I just kept looking at them wrong and so I couldn't figure out how it was going to turn out right. I kept looking at the base of the leaf and thinking it was supposed to be the point so I couldn't see what I was doing wrong (even though I was doing it completely right!) It finally clicked and then it went smoothly. The berries were really easy, watch out though. I pulled too hard on the yarn when I was pulling them into the ball shape and it broke. So go nice and easy, smoothly pull the yarn and it should be fine.
Voila the finished product! I think it turned out really cute. What do you think? Have you made anything fun for the holidays this year? Any gifts or decorations? We'd love to see pictures of the things you've made and share your story too.
We hope you have a great holiday season!! Happy Hanukkah! Merry Christmas!


Fantastic job Heidi!! I have been wanting to try out this pattern for a while and haven't had a chance! Now you have motivated me to be more serious about it!
ReplyDeleteThanks! It was fun and went fairly quickly. You crochet faster than I do so it should be a snap for you. :)
Delete